Understanding Proxies
Proxy servers retrieve data on the internet on behalf of the user. In a normal situation, whenever you want to access a particular website, you open the web browser, type the URL/ address, and retrieve the web page from its web server. However, when you are going through a proxy, the proxy server will retrieve that web page for you. See the image below.

Proxy Benefits
- Online Privacy: Proxies allow you to surf the internet anonymously by hiding your IP address. Whenever you visit a website without a proxy, the public IP address is visible, and people can see which sites you are visiting.
- Improves Speed: A proxy server caches data which improves browsing speeds. For example, if “User One” visits “Website A,” the proxy server will cache the web page database. Therefore, whenever “User Two” wants to access the same website, the proxy server doesn’t need to retrieve the website again from its web server.
- Saves on bandwidth: The proxy server saves the bandwidth needed to retrieve webpages from the webserver by caching data.
- Activity logging: A company can keep track of its employees’ online activity (e.g., the websites they are accessing) using a proxy server. It can also block malicious websites.
This article will give you a step-by-step procedure for setting up a system-wide HTTPS proxy on Ubuntu 20.04 LTS. Let’s dive in.
Set System-Wide HTTPS Proxy in Ubuntu 20.04 LTS
There are two main ways we can use to set up system-wide proxy settings on Ubuntu:
- Command-line method: Using Environmental variables
- Graphical method: Ubuntu Network Settings
This post will look at all the ways above.
[Method 1] Set System-Wide Proxy settings on GUI
This method is highly suitable for users running Ubuntu-Desktop or those who don’t like getting their hands dirty by executing numerous commands on the Terminal. To get started, launch the Settings window (Gnome Control Center) and select the Network tab as shown below. You will notice that the proxy setting is disabled by default.
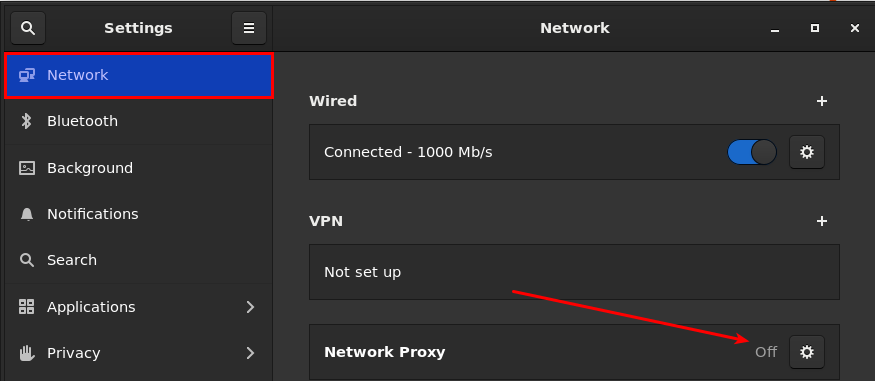
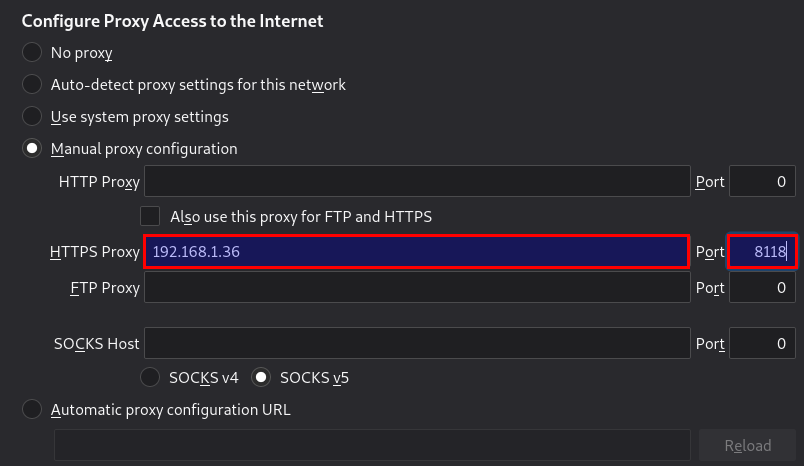
Click on the Settings icon next to the “Network Proxy” option. That will launch the Network Proxy configuration window. You will see three options; Automatic, Manual, and Disabled. Select the Manual option. That will reveal the various protocol handlers you wish to use with your proxy server. They include HTTP, HTTPS, FTP, and Socks. In this post, we are only concerned with HTTPS. Therefore, enter your Proxy address and port as shown below.

Close the window when done.
Note: For this article, we are using a Raspberry Pi as our Proxy server using Privoxy. Privoxy is a free and open-source non-caching web proxy.
To apply these new network settings, you also need to set the proxy settings of your browser. We will only look at Firefox; however, the procedure shouldn’t differ from other browsers. Follow the steps below.
- Enter the URL about:preferences and hit enter to open the Firefox Preferences configuration window.
- Scroll to the bottom of the window and click the Settings button under the Network Settings section.
- That will open the Connection Settings window. Select the “Manual proxy configuration” option and enter the proxy IP address and port next to the HTTPS protocol, as shown below.
- Click Ok when done.
[Method 2] Set System-Wide HTTPS Proxy settings on Command-Line
There are different ways you can set a system-wide HTTPS proxy on the command line. We can use – Environment variables, edit the /etc/environment or add a shell script /etc/profile.d/proxy.sh. We will look at all these methods.
Note: Our proxy server is 192.168.1.36 and runs on port 8118.
We will be using the Curl utility to test the validity of our Proxy settings. cURL (client URL) is one of the most used commands to automate the process of sending and receiving data to or from a server. Read our In-Depth Tutorial on the Basics of HTTP Requests with cURL.
If you don’t wish to set a system-wide proxy for all HTTPS requests on your host, you must specify the proxy server address in your command. For example, if you wanted to use curl through a proxy server, use the syntax below.
| curl -I -x [ProxyServerIP]:[ProxyPort] [URL] E.g curl -I -x 192.168.1.36:8118 https://google.com |
|---|

System-Wide HTTPS Proxy With Environment Variables
Environment variables are dynamic values that affect the processes of programs in a computer. They exist in every operating system, and they can change the way software/ programs behave. Environment variables can be created, saved and deleted.
To set HTTPS proxy environment variables, we need to use the export command shown in the syntax below.
| export HTTPS_PROXY=https://[proxy_ip]:[port_number] E.g export HTTPS_PROXY=https://192.168.1.36:8118 |
|---|

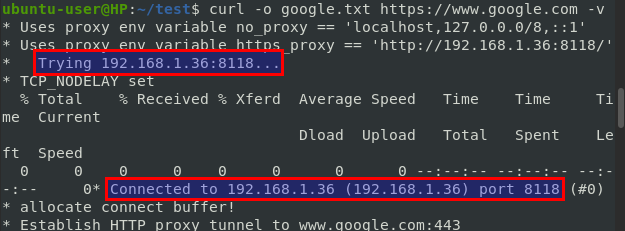
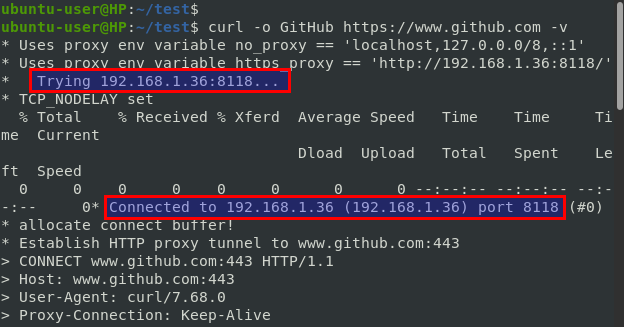
To test our proxy settings, we will use the curl and wget commands below.
Curl Command
| curl -o google.txt https://www.google.com -v |
|---|
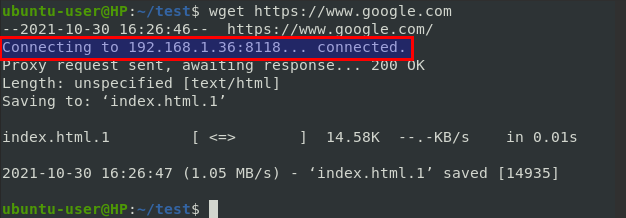
Wget Command
| wget https://www.google.com |
|---|
Note: Unfortunately, using Environment Varivbales to set HTTPS proxy is limited to the shell and the user who created the variable. Therefore, if you close the shell or log out, you cannot use this proxy anymore.
We will need to append these lines to the /etc/environment file as shown below to solve this issue.
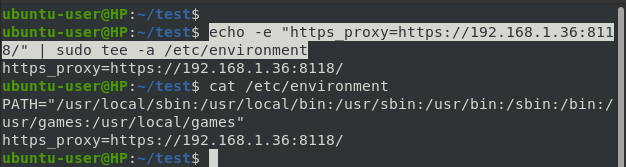
System-Wide HTTPS Proxy With the /etc/environment File
To make the proxy environment variables apply to all users in the system and available across all shells, we will need to add the commands in the /etc/environment.
| echo -e “https_proxy=https://192.168.43.100:3128/” | sudo tee -a /etc/environment |
|---|
These configurations will take effect on system login since the /etc/environment file is read on logging in. However, we can use the netplan utility to apply the changes sooner. Execute the command below.
| sudo netplan apply |
|---|
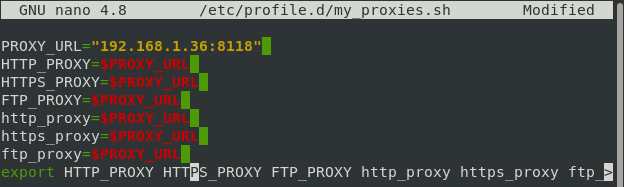
System-Wide HTTPS Proxy With a Shell Script
Alternatively, you can create a shell script in the /etc/profile.d directory that sets the various Proxies for all logged-in users. Let’s create a new file my_proxies.sh, with the command below.
| sudo nano /etc/profile.d/my_proxies.sh |
|---|
Paste the lines below and remember to replace the IP address and port number with that of your proxy server.
Note: These settings will set proxies for several protocol handlers like HTTP, HTTPS, and FTP. However, you can delete the other lines and leave the protocol which you want to affect.
| PROXY_URL=”192.168.1.36:8118″ HTTP_PROXY=$PROXY_URL HTTPS_PROXY=$PROXY_URL FTP_PROXY=$PROXY_URL http_proxy=$PROXY_URL https_proxy=$PROXY_URL ftp_proxy=$PROXY_URL export HTTP_PROXY HTTPS_PROXY FTP_PROXY http_proxy https_proxy ftp_proxy |
|---|
Save the file (Ctrl + S) and Exit (Ctrl + X). Next, we need to make the file executable by running the command below.
| sudo chmod +x /etc/profile.d/my_proxies.sh |
|---|
To apply the new configuration, you can either log out then log in again or use the source command below.
| Source /etc/profile.d/my_proxies.sh |
|---|
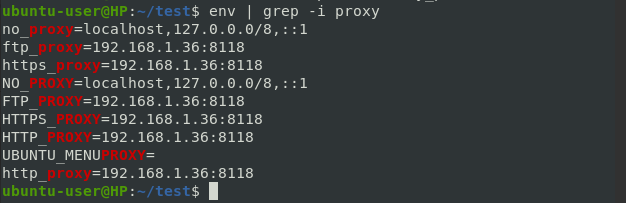
You can verify the set proxies by executing the command.
| env | grep -i proxy |
|---|
That’s it! You have successfully set a system-wide HTTPS proxy on Ubuntu 20.04 LTS. Did you come across any errors? If yes, don’t hesitate to leave a comet, and we will help you where we can.